

Table of Contents
- Why Your Lipstick Smudges (and What Actually Works)
- Step 1: How to Prep Lips for Lipstick the Right Way
- Step 2: Line and Fill to Stop Lipstick From Bleeding
- Step 3: Apply the Base Layer With a Brush
- Step 4: The Lipstick Setting Powder Hack That Works
- Step 5: Blot, Seal, and Reapply for Lasting Color
- Common Mistakes That Ruin Your Smudge-Proof Look
- Frequently Asked Questions
Last Updated: September 6, 2026
Few beauty frustrations match the moment you check a mirror mid-afternoon and find your lipstick has migrated into fine lines or left a ring on your coffee cup, which is why knowing how to keep lipstick from smudging is so valuable. Learning how to keep lipstick from smudging comes down to preparation and technique, not just buying a pricier tube. The process below delivers color that survives meals, meetings, and everything between.
The secret is that smudging is rarely the lipstick's fault. It is usually a layering problem. Most people apply color to unprepared lips, skip the liner, and never seal the finish, which is why the product transfers within an hour. The eight steps that follow address each failure point directly, from exfoliation to the final blotting pass.
Why Your Lipstick Smudges (and What Actually Works)
Smudging isn't random; it's a predictable reaction between the formula's chemistry, your skin's biology, and the environment. Understanding the why behind each failure point lets you choose the right fix instead of relying on guesswork.
The Chemistry of Transfer
Lipstick is essentially a suspension of pigments and waxes in an oil base. The ratio of these components dictates its behavior:
- Oil-heavy formulas (creams, satins, glosses): These contain a high percentage of emollients like castor oil or lanolin. While they feel comfortable, the excess oil stays liquid on the lip surface. When your lips press together or touch a cup, that unbound oil, and the pigment carried with it, transfers. This is why a creamy lipstick will always smudge more than a dry matte.
- Wax-heavy formulas (matte, long-wear): These use a higher proportion of waxes like candelilla or carnauba to create a solid film. The film physically locks pigment in place, making transfer less likely. However, this structure is brittle; it can crack and flake if the lips underneath are dry or if the formula lacks a flexible polymer.
- The Polymer Factor: Many transfer-resistant formulas include film-forming polymers (like trimethylsiloxysilicate). These create a flexible, continuous film that adheres to the skin and resists the mechanical friction of eating or talking. If a product claims to be 'smudge-proof,' it is usually relying on this polymer network.
The Skin's Role: Oil and Texture
Your lip's natural sebum and the oils from your skincare products are the primary solvents that break down a lipstick's wax structure. As your skin produces oil throughout the day, it seeps into the lipstick layer, dissolving the wax and turning the pigment into a mobile liquid that can bleed into fine lines. This process is accelerated by:
- Natural Lip Movement: The constant motion of talking, smiling, and drinking creates micro-fractures in the lipstick film, providing channels for pigment to escape.
- Fine Lines and Texture: The skin around the lips (the vermilion border) is delicate and often develops vertical creases (peer-reviewed research). These act as capillaries for migrating pigment, pulling color away from the lip surface and into the skin.
The Environmental Wildcard
Most guides ignore the world outside your bathroom mirror, but it is a major factor:
- Humidity and Heat: High humidity introduces water vapor, which can destabilize the oil-wax matrix in some formulas. Heat softens the waxes, making the lipstick more pliable and prone to smearing. A lipstick that survives a 70°F office day may not survive a 90°F outdoor event (acs.org).
- Mask-Wearing: The friction of a face mask is a mechanical stressor that rubs pigment off the lip surface. Furthermore, the warm, humid microclimate inside a mask increases perspiration and oil production around the mouth, creating a perfect storm for transfer and fading.
What This Means for Your Routine
There is no single 'best' technique; the best routine is one that addresses your specific formula and environment. A heavy, oil-based cream needs more structural support (liner, powder) than a lightweight, polymer-rich liquid lipstick. A routine for a humid summer day will differ from one for a dry, air-conditioned office. The steps that follow are designed to be modular, allowing you to adapt them to your specific lipstick and your day.
Step 1: How to Prep Lips for Lipstick the Right Way
Lip preparation is the foundation of any smudge-proof look, and it starts with smooth, hydrated skin. Dry patches and cracked texture grab onto pigment unevenly, causing color to flake and slip within an hour of application.
Begin with gentle exfoliation to remove dead skin. A soft toothbrush or a washcloth works, but a dedicated lip scrub is more consistent. Follow with a thin layer of balm and let it absorb for a few minutes before you do anything else. Blot away any excess with a tissue so the surface is moisturized but not slick, since oil is the enemy of staying power.
For those with deep fine lines, a lip primer creates a smooth canvas that fills crevices and gives pigment something to grip. This single step noticeably reduces feathering later in the day.
Step 2: Line and Fill to Stop Lipstick From Bleeding
Lip liner acts as a dam that keeps color inside your natural lip contour. Choose a pencil that matches your lipstick or your natural lip tone, and trace just inside your actual lip line to create a defined edge.
The trick most people miss is filling the entire lip with liner, not just outlining the border. This creates a uniform wax-based base layer that anchors the lipstick and prevents the bleeding that happens when color seeps into the fine lines around your mouth. A well-filled lip also means that as the lipstick fades through the day, it fades evenly rather than leaving a stark outline.
Step 3: Apply the Base Layer With a Brush
Applying lipstick directly from the tube deposits too much product at once. A lip brush gives you control over coverage and keeps the color thin and even, which is essential for preventing smudging.
Start at the center of your lips and work outward toward the corners. Build the color in two thin layers rather than one heavy coat. This technique is how makeup artists achieve full coverage that still feels weightless, and it is the difference between color that stays put and color that shifts with every expression.
Step 4: The Lipstick Setting Powder Hack That Works
The translucent setting powder hack is the most reliable way to lock color in place without changing its finish. Place a single-ply tissue over your lips, then use a fluffy brush to dust translucent powder lightly over the tissue. The powder passes through the tissue fibers and sets the lipstick beneath without dulling its sheen.
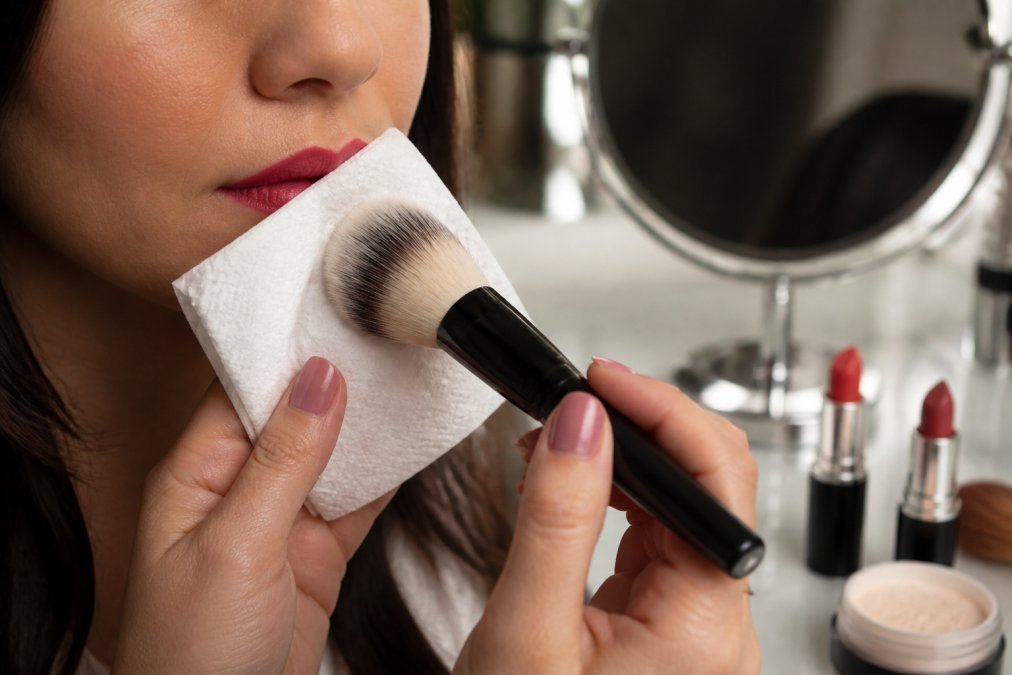
This technique absorbs the excess oil that causes transfer and creates a smear-resistant barrier. For a matte finish, apply the powder directly to the lips without the tissue barrier, but be aware that this can emphasize lip texture and fine lines. The tissue method preserves a more natural look while delivering the same staying power.
Step 5: Blot, Seal, and Reapply for Lasting Color
Blotting removes the excess product that causes most smudging. Press your lips together on a tissue, then apply one more thin layer of color and blot again. This double-coat method ensures the pigment bonds to your lips rather than sitting on the surface where it can transfer.
To seal the look, hold a tissue over your lips and mist a light layer of setting spray over the tissue. This locks the color without the wet, heavy feeling of spraying directly. The final layer should feel dry to the touch within a minute, and your color should survive coffee, conversation, and even a quick meal.
Common Mistakes That Ruin Your Smudge-Proof Look
Beyond the usual suspects like skipping prep or over-applying balm, there are three specific mistakes that sabotage a smudge-proof look, especially for those with unique lip structures. These are the issues that generic advice often misses.
Mistake #1: Ignoring Your Lip's Architecture
Your lip shape dictates how color wears, and a one-size-fits-all approach will fail.
- For Mature Lips (with Fine Lines): The primary mistake is using a dry, matte formula directly on the lip. The lack of moisture causes the formula to settle into the vertical creases, creating a stark, feathered appearance. The fix is not to abandon matte, but to change the base. A silicone-based lip primer is essential; it fills the micro-crevices, creating a smooth surface for the color to adhere to. This prevents the pigment from pooling in the lines. Additionally, avoid over-lining the outer edge; a sharp line on textured skin will only emphasize the wrinkles.
- For Thin Lips: The mistake here is over-lining outside your natural border to create volume. When you over-line, you are placing color on skin that has a different texture and oil production than your lip itself. The skin's natural movement will cause the color in that over-lined area to break down and smudge faster than the color on the lip, leading to a 'bleeding' effect by mid-day. Instead, keep the color strictly within your natural lip line. To create the illusion of volume, use a lighter shade in the center of the lip and a slightly darker shade at the corners, which adds dimension without the smudging risk of over-lining.
Mistake #2: Treating All 'Long-Wear' Formulas the Same
Not all transfer-resistant products are created equal. A common error is assuming a 'liquid lipstick' is inherently more smudge-proof than a bullet. The reality is:
- Liquid Lipsticks (with high polymer content): These dry down to a film. They are excellent against transfer but are notoriously unforgiving. If your lips are even slightly dry, the film will crack and peel, which looks worse than smudging. The mistake is not prepping with a hydrating balm and letting it fully absorb before application. The balm creates a flexible base that prevents the film from cracking.
- 'Blotted' Matte Bullets: These are often wax-heavy but lack the polymer film. They are less likely to crack but will still transfer if you don't seal them with powder. The mistake is treating them like a liquid lipstick and skipping the powder step, assuming the 'matte' finish is enough.
Mistake #3: Forgetting the Removal Factor
A smudge-proof look is only a success if you can remove it without damaging your lips. The mistake is using aggressive scrubbing or oil-based removers that strip the delicate lip skin, leaving it dry and cracked for your next application. This creates a vicious cycle where you need more balm, which then causes your next lipstick to smudge.
- The Safe Removal Protocol: Use an oil-based cleanser or a dedicated eye and lip makeup remover (the American Academy of Dermatology). Press the soaked cotton pad onto your lips for 10-15 seconds to break down the polymer film, then gently swipe. Do not rub. Follow with a thick layer of a fragrance-free, occlusive balm (like plain petrolatum) to restore the moisture barrier overnight. This ensures your lips are healthy and primed for your next smudge-proof application.
Frequently Asked Questions
Does setting powder actually help lipstick stay on longer?
Yes. The powder hack absorbs excess oil from the lipstick and creates a dry, matte surface that grips the color to your lips. This barrier helps prevent smudging and transfer onto cups or clothing. For best results, use a translucent powder and a soft brush, and apply it after blotting the first layer of lipstick.
How do I keep lipstick from smudging while eating?
Stick to the center of your food to avoid contact with the outer edges of your lips where color is most visible. Choose a long-wear, transfer-proof formula and apply a lip liner as a base. After your meal, blot your lips gently and reapply a thin layer of color to refresh the look.
What is the best way to keep lipstick from bleeding into fine lines?
The key is creating a smooth, dry canvas. Exfoliate to remove dry skin, then apply a thin layer of lip primer. Trace a lip liner around your mouth and fill in the entire lip area to act as a barrier. This wax-based layer prevents the creamy lipstick from seeping into the fine lines around your lips.
How can I make my lipstick smudge-proof without buying new products?
Use the tissue and powder method with what you already own. After applying lipstick, place a single-ply tissue over your lips and dust translucent face powder over it. The powder sets the color underneath. Finish with a light blotting to remove excess and lock in the color for hours.